
Create Docker Swarm on Centos
The goal of this article is to achieve a clean installation of Docker and Docker Swarm on Centos 7.X, then we will also create our first cluster.
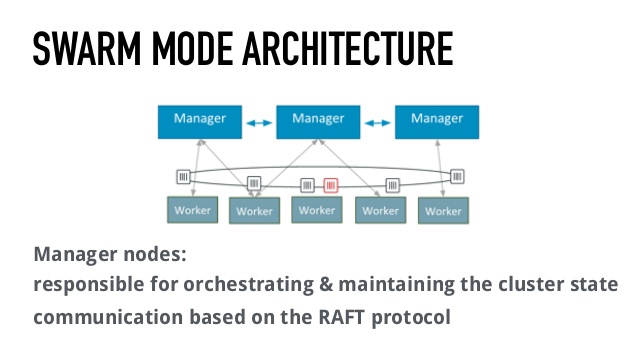
To do this we start by installing Docker from the official repositories of Centos, then create a cluster with 2 Master nodes and 1 Worker node as an example and use basic docker swarm commands to check the status of our cluster.
Other articles will follow explaining how to create services, use a local Docker Registry, Docker compose and other related topics.
Install Docker using the Docker Official Repositories
To do this we can follow the official documentation, but here you have what you need to do:
-
Install yum-utils, which provides the yum-config-manager utility:
$ sudo yum install -y yum-utils -
Use yum-config-manager to install the repository:
$ sudo yum-config-manager \ --add-repo \ https://download.docker.com/linux/centos/docker-ce.repo -
Install Docker
 $ sudo yum makecache fast
 $ sudo yum install docker-ce
In order to check the version of docker that we have installed
$ sudo docker version
Client:
 Version:      17.03.1-ce
 API version:  1.27
 Go version:   go1.7.5
 Git commit:   c6d412e
 Built:        Mon Mar 27 17:05:44 2017
 OS/Arch:      linux/amd64

Server:
 Version:      17.03.1-ce
 API version:  1.27 (minimum version 1.12)
 Go version:   go1.7.5
 Git commit:   c6d412e
 Built:        Mon Mar 27 17:05:44 2017
 OS/Arch:      linux/amd64
 Experimental: false
On production systems is advised by the official documentation to do not always blindly update to the latest version. To list all available versions of docker existing on the repository, you can use the following command:
$ yum list docker-ce.x86_64 --showduplicates |sort -r
-
Enable the Docker Daemon
 $ sudo systemctl enable docker
 $ sudo systemctl start docker
Create the Docker Swarm Cluster
Prerequisites
The prerequisites to follow this tutorial are pretty straighforward:
- Docker version > 1.12 (Swarm mode was introduced in this version)
- The following ports must be available between members of the Cluster:
- TCP port 2377 for cluster management communications
- TCP and UDP port 7946 for communication among nodes
- UDP port 4789 for overlay network traffic
If you are planning on creating an overlay network with encryption (–opt encrypted), you will also need to ensure ip protocol 50 (ESP) traffic is allowed.
Create the Swarm
First we will create a Manager node, this action will give us the comments used to add other nodes to the cluster.
First we SSH into the node we want to use as a Manager:
$ ssh node1
- Run the command to initialize the swarm Manager:
In our lab the IP of the Node that initizes the Swarm is 172.21.177.34:2377
	$ docker swarm init --advertise-addr <MANAGER-IP>

	Swarm initialized: current node (rt7coj28xc3hcgxu84m951w43) is now a manager.

	To add a worker to this swarm, run the following command:

	    docker swarm join \
	    --token SWMTKN-1-4dt83pm5az465u6cp6gftcmcwi4s16n0y5qliw526oaix44l74-026n87wpf9tt2d97gcp6uc2ht \
	   172.21.177.34:2377

	To add a manager to this swarm, run 'docker swarm join-token manager' and follow the instructions.
The –advertise-addr flag makes the Manager publish it’s address.
-
Add a new Node to Cluster as Worker
$ docker swarm join --token SWMTKN-1-4dt83pm5az465u6cp6gftcmcwi4s16n0y5qliw526oaix44l74-026n87wpf9tt2d97gcp6uc2ht 172.21.177.34:2377 This node joined a swarm as a worker. -
Add a new Node to the Cluster as Manager
This part of the official documentation is not clearly explained, the following command has to be executed in the server that was used as the master, were we initialized the Cluster, and, it is important to know that one of the Masters will act as a leader, and that the manager nodes share data using Raft, so it is recommended an odd number of Master Nodes for production (3 or 5 minimum)
 $ docker swarm join-token manager
To add a manager to this swarm, run the following command:
$ docker swarm join-token manager
To add a manager to this swarm, run the following command:
	docker swarm join \
	--token 	SWMTKN-1-4dt83pm5az465u6cp6gftcmcwi4s16n0y5qliw526oaix44l74-5t75b72i0dyna8p9quga2odzu \
172.21.177.34:2377
We will then execute the resulting command in the second Manager node for our example:
	$ docker swarm join --token SWMTKN-1-4dt83pm5az465u6cp6gftcmcwi4s16n0y5qliw526oaix44l74-5t75b72i0dyna8p9quga2odzu 172.21.177.34:2377
	This node joined a swarm as a manager.
Check the status of the Swarm
We can use the commands docker info and docker node ls to check the status of the Swarm Cluster
	$ docker info
	...


Swarm: active
 NodeID: wn6l2pua4mvv6m9s7laez2hc2
 Is Manager: true
 ClusterID: lkz7zs8vwr1lf41n2ay4bftgy
 Managers: 2
 Nodes: 3
 Orchestration:
  Task History Retention Limit: 5
 Raft:
  Snapshot Interval: 10000
  Number of Old Snapshots to Retain: 0
  Heartbeat Tick: 1
  Election Tick: 3

  ...
	$ docker node ls

	ID                           HOSTNAME                                      STATUS  AVAILABILITY  MANAGER STATUS
	rt7coj28xc3hcgxu84m951w43    node1                                         Ready   Active        Leader
	tjadwr4itnry5swuuhtytgrjl    node2                                         Ready   Active
	wn6l2pua4mvv6m9s7laez2hc2 *  node3                                         Ready   Active        Reachable
